
This 16×20 canvas stretching tutorial focuses on a giclee print on canvas. However, the steps can also be applied to any medium-sized canvas, whether raw, primed, or painted. I provide tutorials like this for free because I feel that all of us should be able to enjoy creating art without all the “extra costs” that many would charge for this level of information.
16×20 CANVAS STRETCHING – MATERIALS AND TOOLS
Step 1
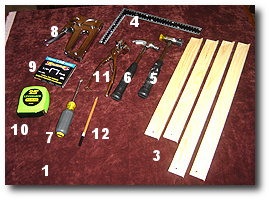
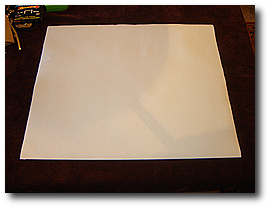
Before starting, Assemble all materials and tools for the 16×20 canvas stretching tutorial.
- Cloth Work Surface
- Giclee Print (not shown)
- Pre-Made Stretcher Bars
- Square Ruler
- Mallet
- Small Hammer
- Flathead Screwdriver
- Staple Gun
- 1/4″ Staples
- Tape Measure
- Canvas Pliers
- Pencil
CANVAS STRETCHING – APPLY GLUE TO STRETCHER BARS
NOTE: (Steps 2 through 4 are optional)
Step 2
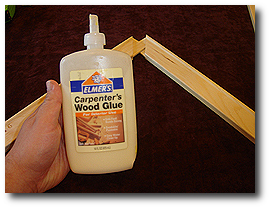
We will use Elmer’s Wood Glue to bond the stretcher bars ends together. Because we are using pre-made stretcher bars that come ready to assemble, we may need to sand rough edges that have resulted from the cutting tools used during the manufacturing process.
Step 3
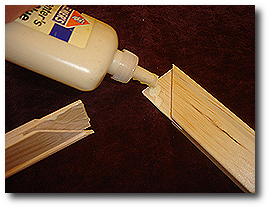
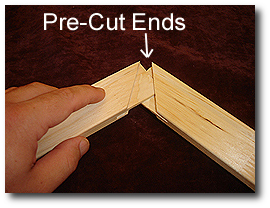
Apply a small amount of glue to each end, as shown. Repeat this for each stretcher bar before continuing to the next step.
Step 4
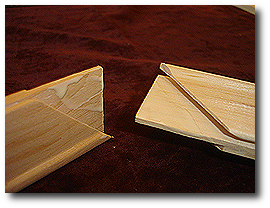
Using your finger, spread the glue around each cut end’s surface, as shown. Repeat this for the remaining stretcher bars.
CANVAS STRETCHING – ASSEMBLE THE STRETCHER BARS
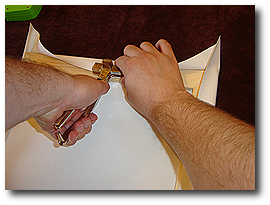
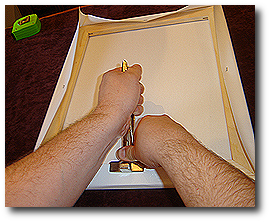
Step 5
Begin mating the stretcher bars.
Step 6
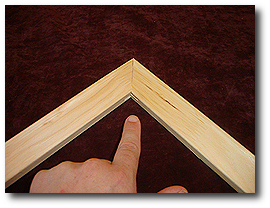
Make sure that you fully seat the stretcher bar ends. If you see a gap along the seam where the ends meet, you have not fully mated the two bars.
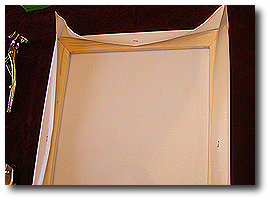
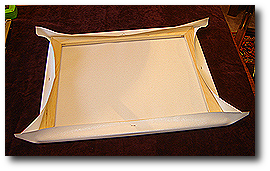
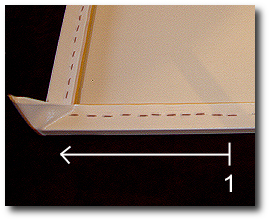
Step 7
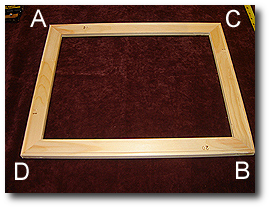
In this view, all four stretcher bars are shown mated together. However, we must ensure that all four corners of this assembly are square before the glue sets. (i.e., A, B, C, & D)
Step 8
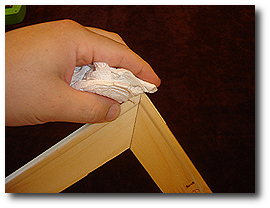
If you used glue (as shown in steps 2 through 4), wipe off any excess glue that has squeezed out while mating the stretcher bars.
Step 9
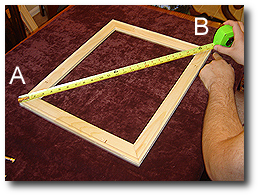
Measure the distance between corner A and corner B.
Step 10
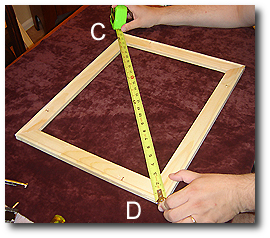
Measure the distance between corner C and corner D.
Compare the two distances against each other. If the distances AB and CD are equal, you are square. If they are not equal, you are not square.
(In our example, distance AB was 0.125 inches larger than distance CD, and we need to make adjustments as shown in steps 11 and 12.)
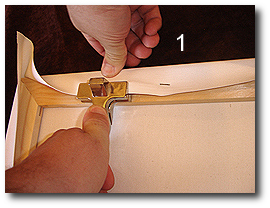
Step 11
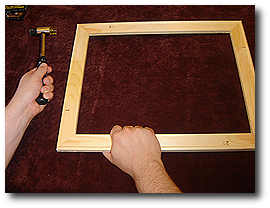
While firmly holding the stretcher bar assembly, tap the corner with a mallet with the largest measurement.
(In our example, we will tap corner A.)
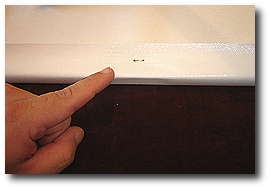
Step 12
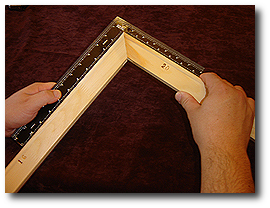
Recheck all corners to make sure they are square. We can use the earlier tape measure or square ruler method shown here.
Hold the square ruler as shown and check that both inside edges of the ruler run flush along the surface of each stretcher bar. You are not square if the ruler lifts off on one side (not running flush along the entire surface). Repeat this check on all the remaining corners. If your stretcher bar assembly is square, you are ready to start the canvas mounting process.
Step 13
Using light-grade sandpaper, gently remove any rough or broken wood from corners.
Step 14
Ensure the corners are thoroughly sanded, and no rough edges remain.
CANVAS STRETCHING – PREPARE FOR STAPLING
Step 15a
Before laying down your giclee canvas print, make sure there are no debris or wood pieces (that may have fallen off during stretcher bar assembly) that could damage the printed surface. A soft cloth work surface minimizes the chances of causing minor scratches to your giclee canvas print.
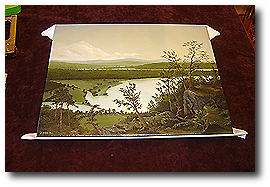
Step 15b
Lay down your print (face up) and make a final close examination to ensure it has no damage.
Step 16
Turn over your giclee print at this point, so the image is face down. You are now ready to position your stretcher bar assembly.
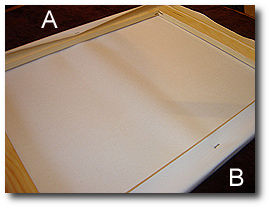
Step 17

Place your stretcher bar assembly over your giclee canvas print as shown.
16×20 CANVAS STRETCHING – STRETCHING AND INSTALLING FIRST STAPLES
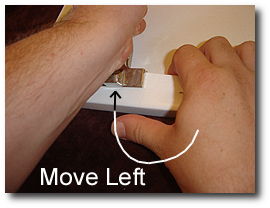
Step 18
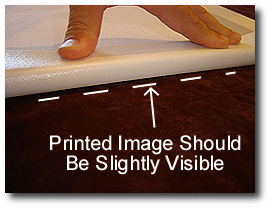
Starting with the right side, carefully lift the canvas print and ensure the image is wrapped around the front face of the stretcher bar. Repeat this on the opposite side, moving the stretcher assembly left or right until you see the image wrapping equally around both sidebars.
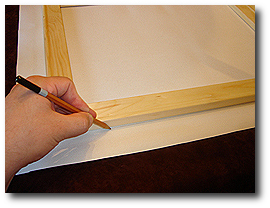
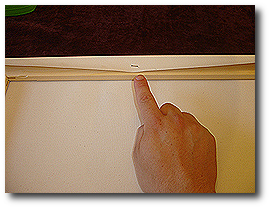
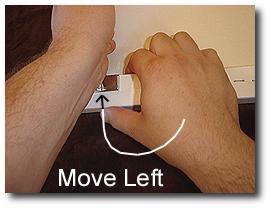
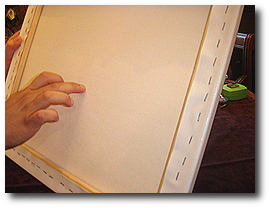
Step 19
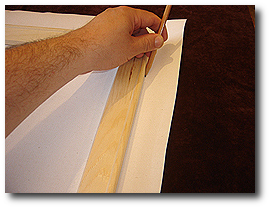
Once you are sure that you have centered the stretcher bar about the printed image, draw a reference line along each side as shown. This reference line will be helpful later if the stretcher assembly moves out of position and you need to realign it.
Step 20
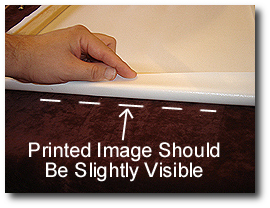
As we did in Step 18 for the side positioning, we want to center the stretcher bar assembly along the top and bottom bars. Carefully lift the canvas print and ensure the image is wrapped around the front face of the bottom stretcher bar. Repeat this for the top stretcher bar, moving the stretcher assembly up or down as needed until you see the image wrapping equally around the top and bottom bars.
Step 21
Once you are sure that you have centered the stretcher bar about the printed image, draw a reference line along each side as shown. We have now centered the stretcher bar assembly in both the vertical and horizontal directions concerning the printed image. We are ready to begin the canvas stretching, wrapping, and stapling processes.
16×20 CANVAS STRETCHING – STRETCHING AND INSTALLING FIRST STAPLES
Step 22a
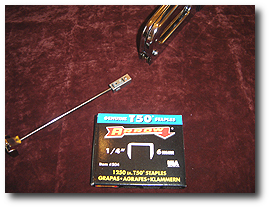
For this example, we have selected 1/4″ staples. Load your staple gun, so you stay supplied with staples partway through the following steps.
Step 22b
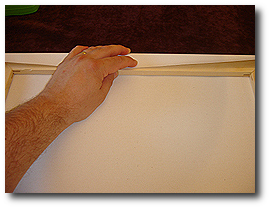
Starting with the top stretcher bar, wrap the giclee canvas print around the stretcher bar as shown. Ensure the stretcher assembly has not moved out of the reference lines we drew earlier.
Step 23
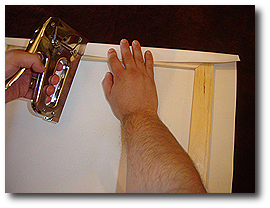
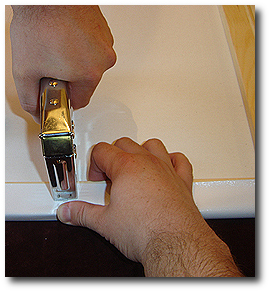
Holding the staple gun squarely on the canvas and stretcher bar, staple the canvas to the stretcher bar in the center of the bar as shown.
Step 24
Check that your assembly looks like this – having one staple in the center of the top stretcher bar.
Step 25

While firmly holding the canvas pliers, grip the canvas in the center of the bottom stretcher bar, opposite from the first staple in the center of the top stretcher bar.
Step 26
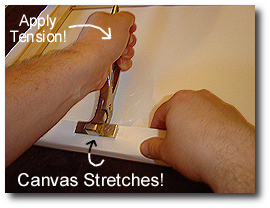
Using the stretcher bar as leverage, rock the canvas pliers forward (compare images from steps 25 and 26) until the canvas has stretched – notice that the canvas is tightly wrapped around the stretcher bar.
Step 27
Before releasing the canvas pliers, press your thumb onto the canvas. Holding your thumb in this manner will maintain canvas tension during staple insertion.
Step 28
While firmly pressing your thumb on the canvas, insert one staple while maintaining tension. Hold the staple gun squarely on the canvas and stretcher bar and staple the canvas to the stretcher bar in the center of the bar as shown.
Step 29
Check that your assembly looks like this – having one staple in the center of the bottom stretcher bar.
Step 30
Once you have inserted the first two staples into the top and bottom stretcher bars as shown you should notice a slight tension pull on the canvas between the two staple points (i.e., points A and B.)
Step 31
Using the canvas pliers, stretch the canvas starting on the left side and hold tension, applying firm finger pressure. (…I am keeping the pliers away from my body, and this provides less stretching and leveraging control. Because I’m not applying tension for the first side staple, I chose to use the pliers this way. However, when you are stretching opposing sides it is recommended to hold the pliers so that they are facing toward your body as shown in images 25 through 28)
Step 32
Insert one staple in the center of the side stretcher bar.
Step 33
Repeat the stretching and stapling process as shown in steps 25 through 28. Be sure to firmly hold the canvas with your thumb before removing the pliers.
Step 34
Be sure to stretch the canvas when stapling opposing sides, so it does not droop or sag. Our assembly should now have one staple placed directly in the center of each stretcher bar, as shown.
Step 35
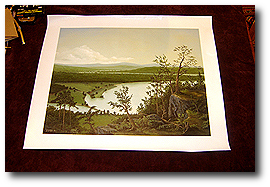
Flip over the assembly to look at the printed image on the front. Check that the image is centered vertically and horizontally – you should see the image wrapping equally around all sides, and no ‘white’ border should be visible along the front face. Check that the image has not rotated clockwise or counter-clockwise so that it is no longer square with the stretcher bars. Also, check that the canvas is not overly loose or sagging. In the following steps, we will tighten the canvas as we stretch, wrap, and insert the remaining staples, but now is the time to remove the staples and make adjustments if the position of the image is off or the canvas is very loose and sagging.
16×20 CANVAS STRETCHING – STRETCHING AND INSTALLING REMAINING STAPLES
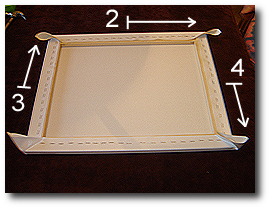
Step 36
Beginning with the top stretcher bar (1), stretch the canvas using canvas pliers and hold tension by applying pressure with your thumb.
Step 37
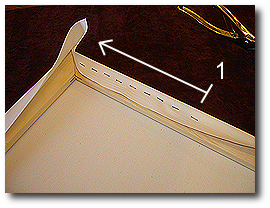
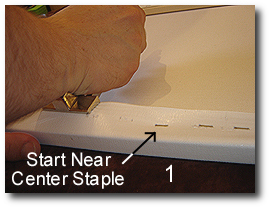
Insert staples starting from the center staple and moving left with each new staple until you reach the left stretcher bar, as shown. Use canvas pliers as needed.
Step 38
Moving to the bottom stretcher bar (2), stretch the canvas using canvas pliers and hold tension by applying pressure with your thumb.
Step 39

Insert staples starting from the center staple and moving right with each new staple until you reach the right stretcher bar as shown. Use canvas pliers as needed.
Step 40
Repeat the previous step for the left (3) and right (4) stretcher bars in that order. Remember to start from the center staple and move toward the arrows (as shown) as you staple the remaining two sides. Use canvas pliers as needed.
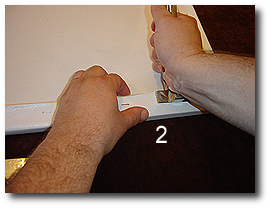
Step 41
Now begin applying more tension when stretching the canvas using the pliers. Always have the canvas pliers facing away from your body during the final stretching and stapling steps for maximum tension and leveraging control. Starting closest to the center staple on the bottom stretcher bar (1), stretch the canvas, maintain pressure with your thumb, and insert two or three adjacent staples starting from the center staple and moving left.
Step 42
Move slightly to the left of the staples you just inserted in step 41, use the canvas pliers to pull the canvas tight, apply thumb pressure to maintain canvas tension, and insert two or three more adjacent staples moving in the left direction toward the left stretcher bar.
Step 43
Reposition the canvas pliers closer to the left stretcher bar, pull the canvas tight using canvas pliers, maintain pressure with your thumb, and insert several adjacent staples.
Repeat this process until you reach the left stretcher bar.
Step 44
After inserting staples along the bottom (1) stretcher bar, your assembly should look like this.
Step 45
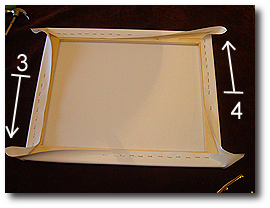
Repeat steps 41 through 44 for the top (2), left (3), and right (4) sides – in that order until your assembly looks like this.
Step 46
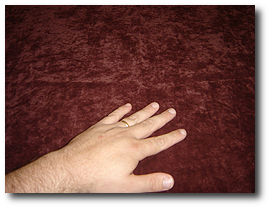
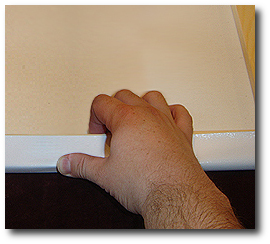
A good test to see if you stretched the canvas enough is to tap the center of the canvas with your finger and listen for a drum-like sound. If the canvas is improperly stretched and loose, it will not have this sound and flop around as you tap it. Also, if you see ripples in the canvas, you have an uneven tension problem – the canvas is not tight.
Step 47
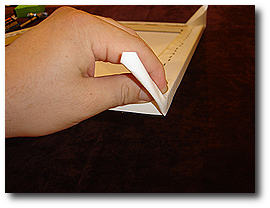
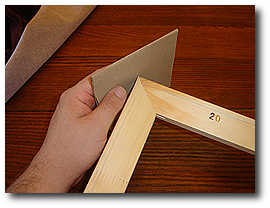
Now we must fold and secure the four corners. Hold the corner of the canvas material as shown.
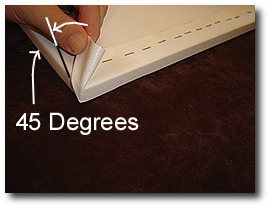
Step 48
While applying tension, wrap the corner around the stretcher bar as shown so that the fold is on the side of the assembly. The fold should run at a 45-degree angle, as shown.
Step 49
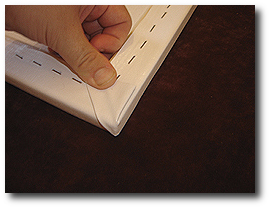
While applying tension on the canvas material, fold it around the back face and hold it securely in the position shown in preparation for stapling.
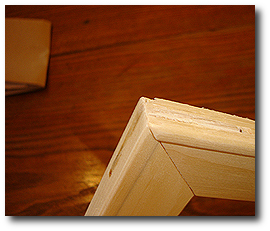
Step 50
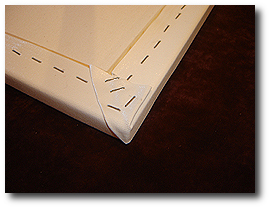
While holding the corner in position, insert several staples as shown.
Step 51
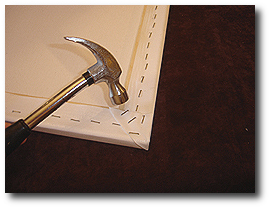
Repeat steps 47 through 50 on the remaining three corners. Be careful that your folded edges are always on along the side stretcher bars. Your finished assembly should look like this when viewed from the back. Use your hammer to insert all staples fully.
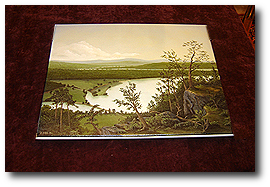
Step 52
You have completed the 16×20 canvas stretching tutorial. Congratulations!
Concluding Thoughts
Please see our 8×10 Canvas Stretching Tutorial, a companion article to this 16×20 Canvas Stretching Tutorial, and learn about using canvas stretching pliers.